AUTOMATING KEYBOARD INPUT USING PUPPETEER AND NODE JS

AUTOMATING KEYBOARD INPUT USING PUPPETEER AND NODE JS
Hey there, welcome once again to another tutorial on trycoder.com where we gonna be talking about Google puppeteer and Node JS. If this is your first time visiting us, I recommend you subscribe to our YouTube channel and stick till the end. If it’s equally your first time reading about Google puppeteer, I recommend you check our introductory article about this and our YouTube video on this.

As you already know, puppeteer is headless chrome which can automate everything a user does with a browser.

Today, we will discuss how to automate keyboard input which could perhaps be in a form field, email or anywhere else.

Puppeteer has a keyboard class which has some methods responsible for keyboard events such as key down, press, type and more.
In the example below, we will examine and how these methods work.

Just as a user would normally do;

  • open a browser,
  • new tab/page
  • open url 
  • and then type something and
  • close browser when done

Let us discuss the following methods of the keyboard class;

keyboard.type(text,[Options])

This method types-in or inputs the text passed as parameter in a field selector (For example; “hello world”). Options can equally be passed to modify it’s operation.

keyboard.down(key,[Options])

As the name implies, this method handles only the key-down event. Which takes as param the key to be pressed down and options. For example, KeyC

keyboard.press(key,[Options])

This method handles both the key-down and key-up event to form a complete key-press.

keyboard.up(key)

As the name implies, this method handles only the key-up event. Which takes as param the key to be release-up and options. 

Now, let’s see how they work in code;

server.js

const puppeteer = require('puppeteer');
(async () => {
const browser = await puppeteer.launch() //launch headless browser
const page = await browser.newPage() //new page/tab
await page.goto('https://www.rapidtables.com/tools/notepad.html') //web link
await page.focus('textarea') //focus on selector which is the text area field
await page.keyboard.type('Hello World');
await page.keyboard.press('Enter');
await page.keyboard.type('Welcome to Google Puppeteer');
await page.keyboard.press('Enter');
await page.keyboard.type('Feel the magic ✨🎁');
await page.screenshot({ path: './uploads/image.png' });
await browser.close() //close browser
console.log ('done')
})()

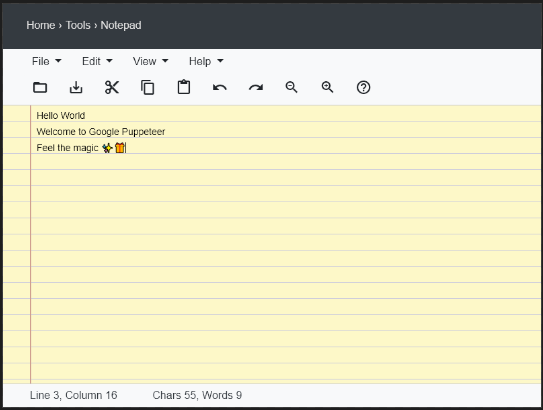
The above code simply opens notepad on the web and then types in some text using the methods explained above.

OUTPUT

Run script:

AUTOMATING KEYBOARD INPUT USING PUPPETEER AND NODE JS

Check uploads folder

AUTOMATING KEYBOARD INPUT USING PUPPETEER AND NODE JS

To read more about the keyboard class of the puppeteer library, you can check out their official doc at : https://pptr.dev/

Thanks for coding with us.


Comments

Popular posts from this blog

Introduction to flask

Hello. Welcome to another session on this platform. If you are new here, please do checkout our previous articles on python programming language and stay excited on this session because we are entering into one of python’s web-based application called flask. In this article, we are going to see the following What is flask Prequistes Installation of flask in python Some of flask template engine. What is flask? Flask is one of python-based framework which is used to create web applications. Flight is a very light web framework. During installation, flask comes with pre-installed modules and functions which are used to backup your own web applications. Flask is very easy to understand and perfect go-to for beginners and with flask, a web server can run in less than 3 lines of code. Prequistes Before learning flask, we recommend the reader to have a basic mastery of python concepts. Installation of flask  Before installing flask, we have to checked if python has been installed or. If n...

How to generate random numbers using NumP1

Hello. Welcome to another edition on this platform. For more better understanding, do checkout our YouTube channel to get the video tutorial. In this article of today, we are going to see how to generate random numbers using any of the following methods: Generating a random number Generating a random float and integer Generating random number arrays Generating random number from an array What is a random number? This is a number which cannot be predicted before its occurrence. This number might not different every time. Programmatically, they are two categories of random numbers:     Pseudo-Random numbers       True Random numbers. Just as programs which are written by programmers are a set of instructions, we must follow an algorithm to generate random numbers. Random numbers which are generated using an algorithm are called Pseudo-Random numbers. To generate a true random number, it is important to get the data from sources such as the keyboards, mou...

Introduction to Django

Hello. Welcome to another session on this platform. If you are new here, please do checkout our previous articles on python programming language and stay excited on this session. we are entering into one of python’s application called Django. In this article, we are going to discuss the following: What is Django Why must we use Django  A brief history of Django Installation of Django Popularity of Django What is Django? Python has so many framework application and Django happen to be one of them. Being a python-based-framework, it is used to quickly create web applications.  When building websites, django provides similar ready-made components to handle user authentication, forms, a way to upload components. Why use django? Django is very fast. It takes applications from concept to applications very quickly Django has thousand available packages in it when it is installed. With django, we can launch web applications is a matter of hours. Django is a highly is secured and helps...